Modelling, 3D printing and painting a cartoon character
By Lassi Warsta, Heidi Salo and Tero Niemi OCTOBER 27, 2015
We wanted to congratulate our friend for her graduation with a custom three dimensionally (3D) printed character. Instead of a colorless print, we decided to test if the character could be painted after the printing process. We had under two weeks allotted for the project and due to the strict time limit we opted for a stylized cartoon form. The printed model was painted with a limited palette and flat color areas to create a resemblance of a typical collectable or toy (Fig. 1a). The beaver character wears a hard hat, is equipped with an antique chainsaw (Pioneer AB Model by Industrial Engineering Ltd.) and stands on a tree stump. An imaginary company logo is engraved into the top side of the stump. We wanted the character to appear to be in motion with left hand held up in the air while holding the heavy chainsaw in the right hand. Instead of using a commercial web based printing company, we decided to test Ultimaker 2 printers. These were available to customers without a fee in selected libraries (Sello and Iso Omena) in Espoo, southern Finland.
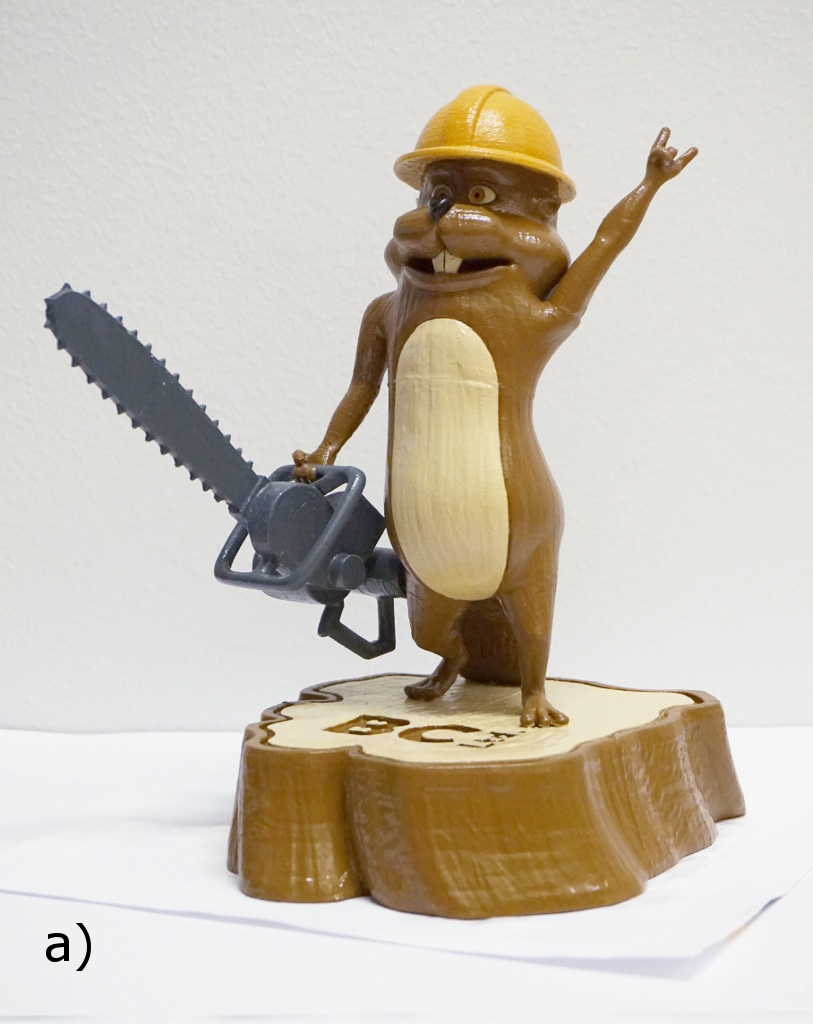
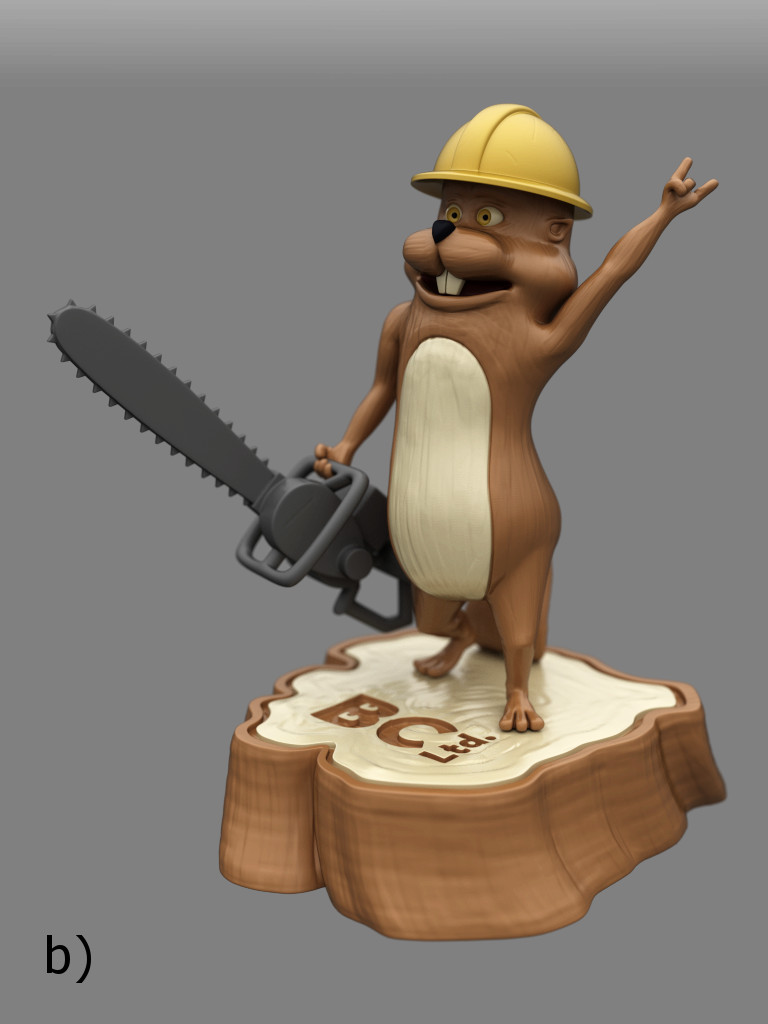
Figure 1. a) a photograph of the finished model and b) a color study of the character rendered in the Blender software. Right click on the image and select View Image for a larger version.
The character and the accessories were modelled in the open source Blender software using basic low polygon modelling approaches. A low polygon cage of the right side of the character was created manually. A Mirror modifier was then used to create the left side. A forward kinematics (FK) rig was created to pose the character into the chosen position. An Armature modifier was added above the Mirror modifier of the character model and the Armature modifier was binded to the bone envelopes of the FK rig. The hard hat, chainsaw and the stump were created with similar low polygon methods. The company logo composed of words “BC Ltd.” was engraved into the stump with the Boolean difference modifier. The lettering in the logo was done with “Berlin Sans FB Demi” font. The hard hat and the chainsaw were also parented to the FK rig so that they would follow the movements of the rig. The rig worked relatively well although some extreme positions caused problems in the mesh deformations. The models were smoothed into high resolution meshes with Subsurf modifiers. After collapsing the modifier stacks, further surface details were added to the resulting models with sculpting using Wacom Intuous 1 drawing tablet. The final model is composed of approximately 2.6 million faces. A color study of the model was rendered with the Cycles renderer in Blender using glossy shaders described in detail by Chocofur.com site (Fig. 1b).
The Ultimaker 2 3D printer applied in this project (2299 € in Amazon.de including VAT at the time of writing this text) uses the fused filament fabrication (FFF) method in which the print is created by depositing molten plastic layer by layer on a heated bed (see Fig. 4). The printer can print Polylactic Acid (PLA), Acrylonitrile Butadiene Styrene (ABS) and Chlorinated Polyethylene (CPE) plastic filaments. PLA is biodegradable and derived from renewable resources. According to the manufacturer, the minimum layer resolution is 20 microns and the maximum build volume is 22.3×22.3×20.5 cm3 (width × depth × height), which defines the maximum size of the printed model. The 3D model is exported from the chosen modelling software to a STL format file. The STL format file is opened in the open source CURA 3D printing software, which is used to adjust the printing settings and to create a printing instruction file for the printer. The instruction file is copied between the computer and the printer with a SD card, i.e. there is no USB connection between the machines.
We decided already early in the project that we would print the character in several pieces. There were several reasons for this. The total size of the model is 14.7×17.1×21.7 cm3 including all the accessories, i.e. the model is higher than the maximum build height. Also, the print jobs had to be finished during the opening hours of the libraries (08:30–20:00 during weekdays and 10:00–18:00 and 12:00–18:00 during Saturdays and Sundays). In addition, it was noticed that the print quality is better in the vertical direction than in the horizontal direction. Therefore, by strategically cutting the model in the right places, it was possible to optimize the quality of the model. Finally, because there are several printers in the two libraries it was sometimes possible to print parts of the model in two or more machines at the same time. For these reasons, the character and the stump were cut into 13 pieces (Fig. 2): hard hat, upper body, lower body, left arm, right arm, chainsaw, tail, left leg and right leg, while the stump was cut into four pieces in a pie chart like fashion. Holes were carved between the joints with Boolean modifiers where plastic pins (18 pins in the whole model) could be inserted to strengthen the joints (Fig. 2).
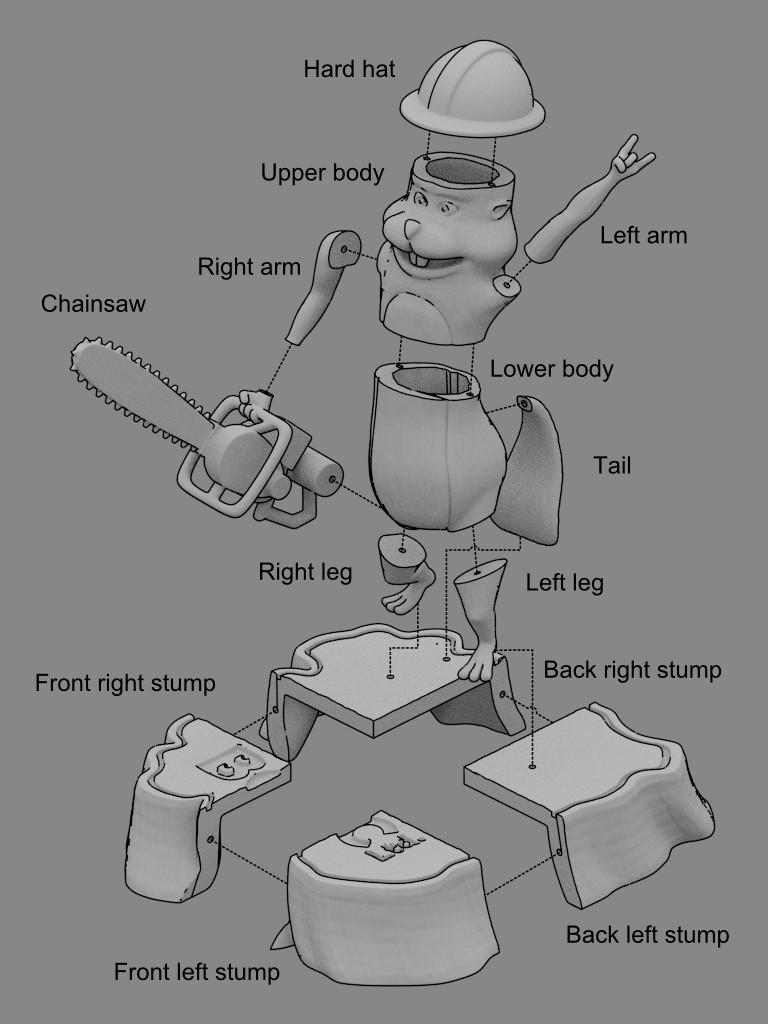
Figure 2. Assembly plan of the model. Dashed lines between the parts mark supporting pin locations in the model. Right click on the image and select View Image for a larger version.
All the parts were printed with a 0.1 mm layer thickness corresponding to the Normal printing quality for Ultimaker 2. For the shell thickness we used 0.4 mm which is the same size as the nozzle size. This parameter is used to define the number of perimeter lines and the thickness of those lines in the model walls. Using this configuration we only had one perimeter line in the outer and inner walls of the model. Increasing the perimeter lines and shell thickness would have increased the printing time. For example printing the upper body part would have taken 5.75 h with 0.8 mm shell thickness compared to 4.6 h with 0.4 mm thickness. For the fill density we used 20% for the smaller parts (arms, legs, tail), the body parts and the chainsaw. Fill density defines the density of the lattice between the outer and inner walls of the model. For the hard hat and the stump parts fill density of 10% was used, which also reduced the printing time of these parts. All the parts were printed with brim platform adhesion type approach. This added a single layer thick area around the printed object, that prevented the corners of the model from lifting up from the build plate and model movement during the printing process. Supporting structures were created with the option “Everywhere” for the chainsaw due to the complex topology of the handle-section (Fig. 3). For the other parts, the option “Touching buildplate” was enough to support the parts in the selected printing positions.
Figure 3. Supporting structures created for the chainsaw model in the CURA software.
The model parts were printed with PLA Pearl-White and White filaments (diameter 2.85 mm) (32 € exc. VAT at the time of writing this text). The total length of the filament used in the printing process was 26 m and material cost for the libraries was altogether approximately 9.2 €. The printing times for the parts were: 2.4 h (hard hat), 4.6 h (upper body), 4.5 h (lower body), 0.85 h (left hand), 0.62 h (right hand), 3.7 h (chainsaw), 1.5 h (tail), 0.85 h (left leg) and 0.73 h (right leg). The stump was printed in four parts that took 2.4 h and 2.5 h for the front parts (with the logo) and 4.7 h and 4.9 h for the back parts. The supporting pins were not printed but cut directly from the filament and sanded down to an appropriate diameter. After the parts had been printed, they had to be cleaned from supporting structures (e.g. Fig. 4 under the nose of the character) and sanded. The supporting structures took almost 30% of the used material. The printing quality appeared to vary between the printers, which could be due to residues stuck in the nozzle of some of the machines. There might have also been differences in the calibration of the machines affecting the distance between the nozzle and the build plate, therefore influencing the printing quality. For example, the back half of the stump was clearly inferior quality compared to the front parts with the company logo. According to the library staff, some of the filament versions (Black and Green) seemed to produce better printing results than others (Silver). The model was glued together with Revell Contacta Professional plastic glue (4.95 € inc. VAT). Gaps between the separate model parts were filled with Citadel Technical Liquid Green Stuff modelling putty produced by Games Workshop (3.30 € inc. VAT).

Figure 4. Printing of the upper body of the character with an Ultimaker 2 printer.
The character was painted with Citadel acryl based colors and XL Base (7.50 € inc. VAT) and Starter brushes. Corax White spray (13.50 € inc. VAT) was used to base coat the model. Our experience was that the paint stuck well to the PLA plastic (and our fingers). Base and layer paint ranges were used to paint the model costing 3.30 € (inc. VAT) per pot. The difference between the two varieties is that the base coats create a good coverage with fewer coats, while layer paints are thinner and let the underlying color show through. The dark brown parts of the model (fur coat and bark of the tree stump) were painted with XV-88 base paint, and the light creamy brown parts were painted with Flayed One Flesh layer paint (Fig. 5a). The helmet and the irises of the eyes were painted yellow with the Averland Sunset base, while chainsaw was painted dark gray with the Mechanicus Standard Grey base. The inside of the mouth was painted red with the Khorne Red base. Thin black lines around the eyes and brown lines around the irises were painted with the Abaddon Black and XV-88 bases, respectively (Fig. 5b). The pupils of the eyes and the nose were also painted with the Abaddon black while Flayed One Flesh layer was used to paint the eyeballs outside the irises. Signatures of the team were added with Abaddon Black base to the bottom of the statue. We had to apply approximately three coats of the base paints to get an even, opaque result while six coats were required for the Flayed One Flesh layer. The model was varnished with a single coat of glossy Citadel Technical ‘Ardcoat varnish.
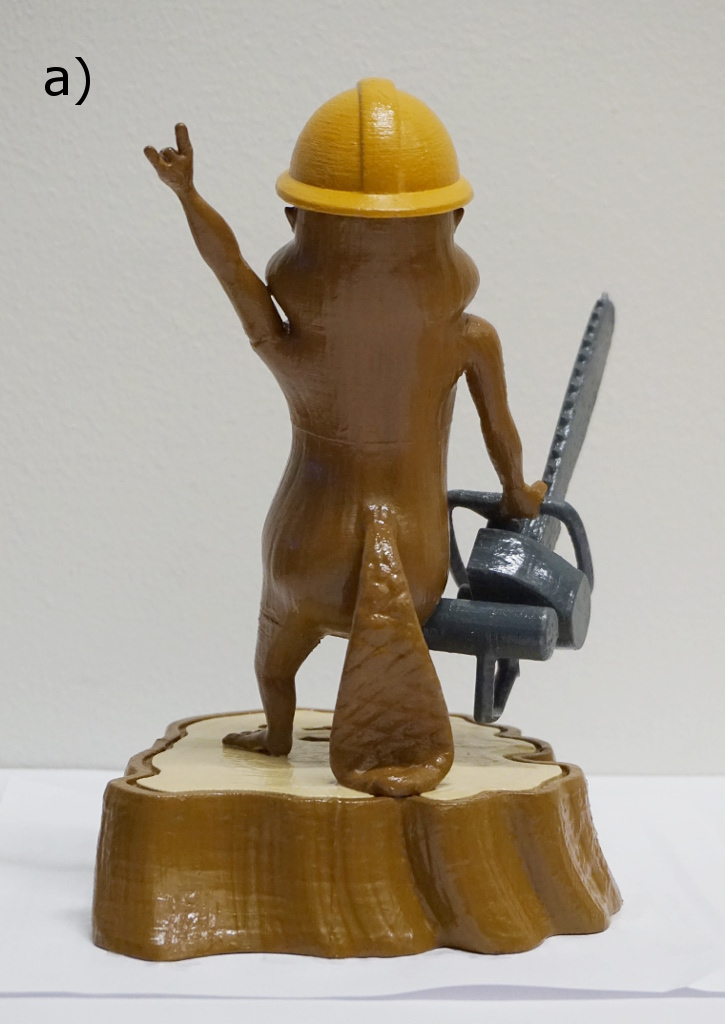
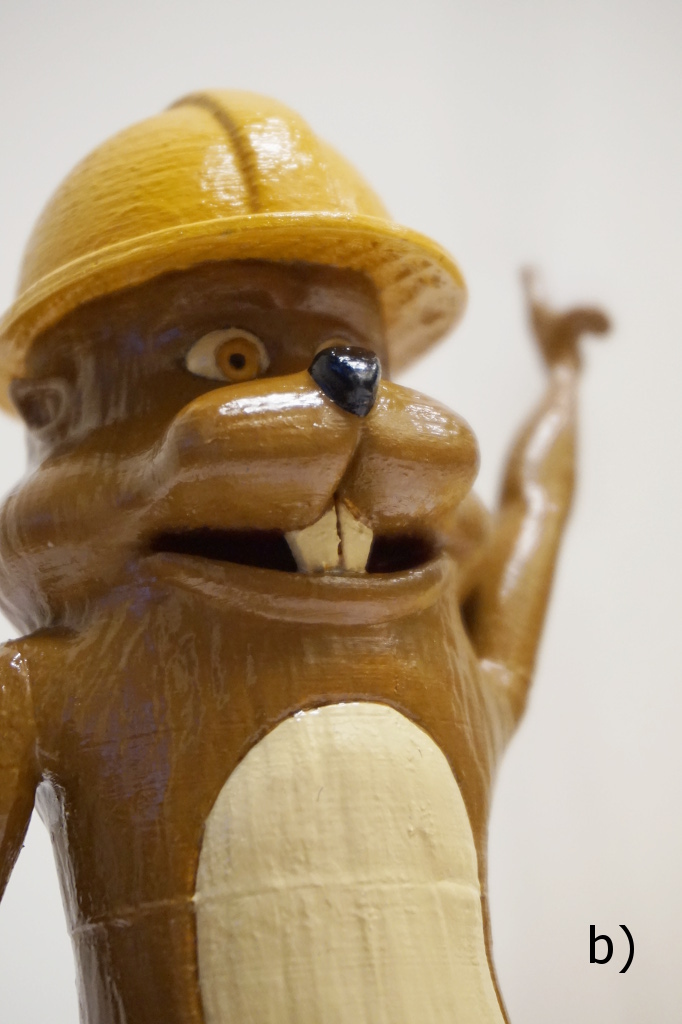
Figure 5. a) backside and b) Close-up photographs of the painted model.
In this project, a cartoon character was successfully designed, modelled, 3D printed and painted during a short two week period. It appeared that the receiver was delighted of the present, and intrigued by the process. The total cost of the project was low (52.35 € inc. VAT, see breakdown of the costs in Table 1), because the libraries did not charge for the use of printers or filaments. We are thankful to the library staff as they on many occasions let us use several printers at once and helped in supervising the printing process. The previously tested selective laser sintering based printer (Shapeways.com) produced slightly better results compared to the Normal quality setting applied in this project. Still, the model parts produced by the Ultimaker 2 printers were surprisingly good after cleaning and sanding. High (0.06 mm layer height) and Ultrahigh (0.02 mm layer height) settings are probably more suited to smaller models than the one created here, since it can take notably longer to print parts with these settings (approximately 1.6 and 4.7 increase compared to the normal quality printing time applied in this project). It appears, that it is very important to optimize the printing direction with FFF based printers, and to take this into account when breaking the model into parts for printing. Some difficulties were experienced in the selection of the colors from the available paint range to match the color study (Fig. 1a vs. Fig. 1b). This was since we did not want to mix paints to save time. For example, no suitable creamy base paints were available from the manufacturer and the selected layer paint required six coats for a good result.
Table 1. Breakdown of the costs for the project. Costs paid by the libraries were not included in the breakdown. VAT included in the prices.
| Product: | Cost (€): |
|---|---|
| Revell Contacta Professional plastic glue | 4.95 |
| Citadel Technical Liquid Green Stuff | 3.3 |
| Citadel XL Base brush | 7.5 |
| Citadel Corax White spray | 13.5 |
| Citadel XV-88 base paint | 3.3 |
| Citadel Flayed One Flesh layer paint | 3.3 |
| Citadel Averland Sunset base paint | 3.3 |
| Citadel Mechanicus Standard Grey base paint | 3.3 |
| Citadel Khorne Red base paint | 3.3 |
| Citadel Abaddon Black base paint | 3.3 |
| Citadel Technical ‘Ardcoat varnish | 3.3 |
| Sum: | 52.35 |